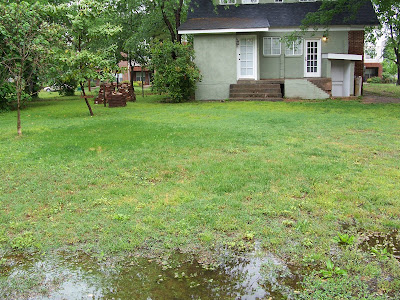
The giant tree sits on the neighbors lot just on the other side of the property line between us. The ground between the tree and the drive is on our side for the most part. High weeds dominated this area until I took the weed whacker to them.
The problem is to water and pay regular attention to this area.
I envision a decorative planting here after getting rid of the weeds and stuff. This patch of ground at the base of this ancient tree has potential in my eyes.
This is the most neglected spot in our yard. For the time being I am decided to get after this with loping shears and shrub rake to start cultivating something swell.
It's kind of like the ugly duckling if you know what I mean. Something small that's actually great.
Urban essay: A landscape, grounds keeping photo journal of transforming a weed lot into a garden. A "How we are doing it from scratch" web log. Topics include: grounds keeping, gardening, planning, landscape construction design, materials, equipment and supplies. Tools for lawn and turf care, tools for gardening, tools for landscape construction, and tool maintenance. Sources for tools and equipment, product evaluations and price comparisons. Garden project cost accounting.
Friday, July 31, 2009
Thursday, July 30, 2009
Summer Survey - Front Yard Corners by the Porch
This corner of the front yard needs attention. The drive needs a definite point of termination as it meets this space. That should be a point about 6' from the wall towards the curb. A definite termination line holds the car back. The ground around the house can be built up about 6" as a grade separate from the drive that joins the front and side yards. There needs to be a walkway here which will handle the wheelbarrow, the mower, sweeper, etc. It is like running into a ditch when you try to roll something through here now.
This side, the west side also needs to be an even transition space where the front and side yards meet. The path from this side intersects with the path from the front steps to the car. It is like rolling off the side of a hill when you try to roll something through here, like the garbage can. These areas demand walkways which are constructed with definiteness. They must be perfectly functional and handsome in a manly way.
This is part of my overall improvement plan in which I want the ability to walk all the way around the house barefooted, without getting my feet dirty, or tracking dirt into the house. Actually I need to amend the plan to be able to wheel the lawn sweeper, the largest of my wheeled fleet, all the way around the house unobstructed, except for the gates. This is in addition to the clean feet directive.
Wednesday, July 29, 2009
Mid-summer Lawn Mower Tune Up
Now that we are turning the corner in the summer it is time I raise the lawn mower frame on the big drive wheels up a notch to let the grass grow higher. This is an operation separate from the adjustment of the red tabs on the back wheels. This operation will raise the whole mower frame higher relative to the axle of the big drive wheels. I'm going from low to medium.
I examined a Scotts reel mower at Home Depot. I found that the Scotts mower is constructed similarly to my Craftsman mower.
To get to the wheel axle bolt the dark colored cap pops off. (This is the left wheel.)
After removing the axle bolt with two wrenches the wheel is easily removed and this is what's there. You can see that the big gear inside the wheel drives the little gear on the reel shaft. The little gear just slips off and there is a small pin going through the shaft. The big gear of the wheel turns the little gear which turns the reel.This pin in the shaft catches a notch inside the little gear when it is spinning in the drive direction and engages to spin the reel. In reverse the pin allows the gear to spin free so the wheel spins without engaging the reel. While I have the wheels off I am going to clean and grease the works. (This is the right wheel.)
Once the wheel and the little gear are removed, the round cover plate just lifts off exposing the frame and the end of the reel shaft. The wheel height is set by putting the axle through one of those three holes, the highest hole giving the lowest cut and the lowest hole the highest cut. It was set for the lowest cut and it will be re-set in the middle. (This is the left wheel.)
I wiped all this with a rag. I used a putty knife to push automotive grease into the bushing of the reel shaft. The small gear got a little grease, too. I wiped the rust with the grease rag to give it a thin, protective coat. I would expect that a more expensive model would have a heavy sealed ball bearing here and the gears of the works fabricated in a stout metal alloy that would not rust. The frame would be beefier and would support a stronger, more tempered reel.
It all goes back together like it came apart. Amazing functionality and simplicity. One bolt holds all the works of one wheel together. (This is the left wheel - reverse angle)
Reel and Blade Strike Adjustment
The blade edge pivots in and out from the reel to adjust for the "strike". Two machine screws on either side will locate the edge in precise alignment with the reel. Too much strike and the blade is too tight to the reel. Too tight and the wheels won't spin. Too little strike, the wheels turn freely but the reel does not contact the blade edge sufficiently to cut the grass. Adjustment is made between the blade and the reel to strike so that it slices paper and still spins smoothly with a firm push. In a more expensive model this could be done with a stronger blade and knobs on either side coming up the handle with a machine adjustment. Reel strike adjustment would be possible on the fly without a screw driver. I noticed an arrangement like this on a 7 mower array at the driving range the other day. That is a mowing apparatus a tractor drags around a fairway which is 7 independent reel mowers linked together. Each mower is about 4 times the size of my mower and arrayed in something of a "flying wedge", if you know what I mean.
With the works serviced, the wheels raised and the strike adjusted, the mower is now good to go. That is my mid summer mower tune up. Didn't have to change engine oil and have the waste oil to deal with. Didn't have to take a blade off and set up the grinder to sharpen the blade and then have to put the blade back on. No gas to worry about. No air filter to change. No spark plug to fool with cleaning and resetting. No heavy lifting. My little reel mower needs little maintenance and cuts grass like scissors. On top of that it gives an excellent physical workout free of charge every time it is used.
Tuesday, July 28, 2009
Regular Lawn Maintenance
Today I put on my spike sandals and mowed. I cut the grass an inch higher than the last time I mowed. After mowing I applied Scotts "Southern Turf Builder" with my drop spreader. Then I set up the sprinkler and watered the back yard. While the water was going I took the little shrub rake around the borders of the turf.
Aeration with the spike sandals is doing some good. The spike sandals break up the compacted top soil with little to no damage to the grass. Air can get into the soil, the Bermuda can better spread and the water can penetrate more evenly. The spikes find stones and other objects which need to go over the fence. The turf, thus cultivated, tends to smooth and level itself through natural action. Plus the spikes are good physical therapy for my spine and leg.
When considering different types of fertilizers at first I thought I would use a weed and feed fertilizer. After some careful study of the Scotts Miracle Grow web site I decided to use their product called "Scotts Southern Turf Builder." Though they recommended a weed and feed fertilizer, I went with what amounts to an all purpose lawn fertilizer. I purchased a small bag of the Scotts Southern Turf Builder, which will cover 5000 square feet, for $15 at Lowes. That is about 1/3 less than the weed and feed type. I figure that I have 2300 square feet of lawn at the most, so I will have enough to fertilize next time which is in November.
The Scotts web site is a good place to get information about how to water. It is essential to water thoroughly. Too little just waters the weeds, too much produces disease. Impatience is the only difficult thing about watering.
I purchased the shrub rake at Home Depot the other day for $7. It is sturdy and handy. I use this rake to groom the edges of the lawn and the gravel and to rake the beds.
Monday, July 27, 2009
Summer Survey - New Grill
I'm working on an idea to build the new grill. The last time I grilled, I dragged the table over so I would have something to set platters and utensils on. So I need a grill that is table high with a table next to it.
In the bottom photo is our former island counter top. It is made of concrete and about two inches thick. The two sisters who did all the upgrade work on this house cast the counter tops on site and installed them with the help of some very strong friends. We liked the functionality of the concrete, but, it is too heavy and impossible to clean. Becky replaced this island counter top with Silastone(?).
This led to the thought of using this concrete slab as a table outside. That led to my thinking of incorporating the grill and table into a single unit kind of like a Japanese steak house.
My idea is that the table would lay lengthwise from the house to the fence. The grill would be on the left side supporting that side of the table with a ledge. Concrete block legs would support the other side. If this is workable, I would like to add another grill or flat top griddle.
The table would be a good outdoor work table, too.
I need to make some drawings of the thing.
Sunday, July 26, 2009
Expense Report
I made a register of all our expenses since January of this year for the landscape work.
The total to date is $5112. The expenses broke down into the following categories:
- Tools...............................$ 382 (7.5%)
- Garden supplies...............$ 195 (3.8%)
- Furnishings/ fixtures.......$ 300 (5.8%)
- Major services.................$ 4235 (82.8%)
I had not thought to include finances in this study. The financial report tells a true story. I'm sure I am the last person on earth to figure this out, but I realized that I can find out when I did what by checking the dates of certain transactions. I wanted to know when I fertilized the lawn. All I had to do was check this ledger and discover that I purchased fertilizer the first week of June.
To compile this report I had to go through all my receipts from January, 2009 forward to date. I also had to go through two check registers line by line to glean any transactions for which I did not receive a receipt. In addition to that I went through each monthly folder where I keep the monthly paper collections for any other paperwork or receipts. From now on I will enter transactions on this register as I go.
I also started sub-registers for each of the four categories above. If you want to get a better look at this register, left click on it.
Saturday, July 25, 2009
Survey Line-up Addition
I let the grass grow out next to the fence in this area. I took a little border rake to it to groom and clean it. I like the look. There is some clearance between the fence and earth, the grass is light and long, the fence is clean and preserved. The turf alongside is thick and even. Down the line there is no border grass, no turf, and the fence is dirty. It is a mud hole. This tells me I need to get something in that place to protect the fence.
The soil around the magnolia tree was compacted and low branches blocked sunlight so that nothing would grow there. I removed the low branches to accommodate the fence and that allows more light there. My spike sandals do a fabulous job of breaking up the compacted soil. I think the turf between the magnolia tree and the fence will eventually grow in to connect. Some variety of grass more tolerant of shade will decide to take a stand and spring up to fill in the gap.
When I come to address this situation I will divide and glean a bit from every clump of lariope on the grounds and plant that along the fence where there is nothing. That won't cost anything but labor. This tells me I should do what I can to propagate the lariope to grow as much as possible between now and then. On the other hand, I may find some kind of interesting decorative border grass at a bargain price which would look neat here. I would like to have the turf growing in here and all along the fence as a walk way with a border of tall grass on the fence and a ring of compost around the base of the magnolia tree. This would accommodate the mower nicely.
Friday, July 24, 2009
Summer Survey - Project Line-up (So far)
This is my cool weather improvement projects line- up so far.
Finance and Budget
I need to create a financial report for all the projects. I mark the beginning of this endeavor with the preparations for the fence. That began around the first of February. I have the receipts for all my purchases since then. The budget is an obvious part of these plans but at this point I don't have any account documents in hand. My budget has been to figure out how to do everything without spending anything. This is not really the best way to think. An ability to put the financial account into the record will bring greater ability all-around.
Sidewalk Yard
Remove sod and soil to make grade that will drain sidewalk. Recover 45 cubic feet of top soil and 90 square feet of mixed sod.
East side front
Re-build bed and prepare for spring flora.
Front yard beds
Rebuild, re-space border grass, plant something intermediate in height between border grass and Nandinas.
Hydrant Tree
Make a picnic area. Add soil and propagate grass to raise grade several inches. Improve step path.
Charcoal grill
Design and build a better, more permanent grill.
Herb garden
Clean out and re-situate; prepare for new crop next spring.
Thursday, July 23, 2009
Summer Survey - Sidewalk Yard: Project Number 1?
Our sidewalk has suffered from decades of neglect. Some of the squares are broken and sunk. What I want is a new sidewalk, the east drive removed and the curb replaced. However, due to budget constraints, I may be long gone before that happens so I will have to do what I can in the present to improve this area. The rain runoff comes in from the drive bringing silt and it all collects on the sidewalk. The grass part blocks drainage. Becky is displeased. That means something must be done.
I am going to take a garden spade to this mound and peel off the turf, then cut down the soil from the sidewalk down to the curb to create a slight grade. I will install St. Augustine sod.
I estimate that I will remove about 6" of soil from this area. It is probably about 3' x 30' in area. If I am doing the math correctly I could get up to 45 cubic feet of soil from this location going to the compost plant for processing and re-distribution and 90 square feet of mixed sod. Maybe this should be the first project to tackle so that this soil can be processed and available to all the other cool weather projects.
Wednesday, July 22, 2009
Summer Survey - Tools
I like the idea of spending a generous amount of time planning landscape improvement projects. A cool weather system has been moving through tempting me to drag out a bunch of tools to do something. But my original plan is to do maintenance through the mid summer until such time that I step outside and know that cool weather is here. Then I will mobilize on the projects I am now defining and lining up.
Mobilization is a condition of readiness to perform any sort of landscape construction. The area by the compost plant is the base of operations. Some of the tools will need regular sharpening and other maintenance so this means I will have to set up support stations. Part of this stage of the plan is to muster the tools into a state of readiness.
I will make every effort to create detailed documentation of each project from the study and planning stage through the construction phase and the final result. After the work is done I will complete a final survey of the whole property with the improvements in an orderly brief.
I get a reward to struggle for a long time with some element in the garden, then see it come around and begin to conform to my will. I remember the bleak, depressive landscape. I love the fight to re-claim the ground for the greater good. I love the enlightenment nature gives. Tools and enlightenment go together.
Tuesday, July 21, 2009
Summer Survey - Orphan Bed
In accordance with my summertime survey of cool weather landscape projects, reshaping this area will be in the top five projects. With the excellent morning sun I want to see color and greenery sprouting up within a constructed border next spring. I have a feeling that this is an instance of the thing which is neglected turns out to be a great treasure.
The morning sun would give life to dazzling color in this spot. When approaching the house from the east this is what you see first. I call this the Orphanage. These plants were pruned from other places. I either had to toss them on the compost heap to die or plant them someplace and let them live. So I stuck them here. Later I thought I may as well use some of this trash brick to make a border.
This was a driveway until we put in the fence. I have to recondition my perception of the area to see it in a different light. In the past I have neglected this area. Probably due to the condition of the porch and wall and I didn't have the means to keep this area watered. The fence has brought change and now if I can get my vision up and get a little care and concern I can shape this area into something nice.
Monday, July 20, 2009
Compost
I will set up my compost processing plant first thing when I get started with the cool weather projects. Every improvement project I plan to undertake in the cooler season will produce material for the compost heap. Most of the anticipated projects will receive one or more grades of compost.
One part of the compost plant is the incoming material which is collected from the job sites. Another part of the compost plant is the material the plant produces. My equipment will produce four grades of materials. What I know is plant material decays once it dies. Decomposed plant material is called compost. I don't know much more than that. I'm going to take what equipment I have and try to figure out how to draw out the energy in the process of decay and apply this energy to enhance growth in the garden. I'm not even sure why. It seems like this is the very essence of gardening. Something which I can't really put my finger on compels me to work; to seek, to experiment.
Sunday, July 19, 2009
Weed Killin
Pictured is a late model 1 gallon Ortho pump sprayer. The spray tip is fully adjustable. A pressure relief valve makes it easy to let off the pressure for refilling. The lightweight, compact design makes for convenient use. Becky bought it at Walmart last summer. I think the sprayer was packaged with a bottle of Roundup like the one in the photo and sold as a weed killing kit. I bought this Roundup at Fuller and Sons Hardware for $12. It makes 2-1/2 gallons of weed killer. I may have gotten a better deal at Walmart.
Having been a painter for so many years I have used all kinds of pump sprayers. I have a 2 gallon Gilmour pump sprayer which I once used to apply cleaning solution to exteriors and applying wall paper remover. I used the heck out of that sprayer. In the paint shop I have an old Hudson steel tank sprayer, about 2 1/2 gallons capacity, which I customized to spray oil on shake shingle roofs when I was out in Wyoming. It's a couple of decades old and I doubt if it still works.
Pump sprayers will work perfectly and last a long time if they are given proper care. After use rinse the jug part thoroughly. Then take the pump mechanism and induce water into it from the top of the pump by directing the water hose around the pump handle while pumping. The water gets sucked into the top of the pump and sprays out of the bottom. Pump it till the water is out. Take the tip off the sprayer wand and rinse with the water hose to purge the tip. Put some water in the jug, put in the pump, pump it up enough to spray, and then spray to purge the hose. Empty the water and put in fresh and repeat two or three times to make sure the whole thing is rinsed clean. Drain everything well and store the sprayer on it's side or upside down with the pump mechanism stuck in loosely so it will dry. It's kind of a pain to clean the thing out, and you may get your feet wet, but by doing so you can be assured that it will work next time you want to use it. If the sprayer is allowed to get gummed up and dry out for a long time, it will be next to impossible to get it to work properly. Then you will have a piece of junk and you will have to buy a new sprayer. I guess the good news is that they are less expensive than in the past and more readily available in season. I used to laugh at my brother painters when they'd cuss their pump sprayers because they wouldn't work. They'd beg like dogs to borrow mine. Clean tools which work properly is a point of pride with me.
The weeds are getting high in the alley. Rather than go at them with the string trimmer, I sprayed them with Roundup. I just want fence, gravel and alley back here, no hospitality, and nothing that draws attention to our gate or yard. I used to not be so keen on spraying poison for weed control. That was until last summer when I was employed to keep certain grounds downtown. Part of my job description was spraying weeds growing up in the sidewalks and curbs. Roundup and a pump sprayer is a good system to manage weed control for certain applications in the garden.
When I worked as a grounds keeper last summer we kept a sprayer with Roundup in it at all times since it was used on a daily basis. I don't work like that in my yard. I take one day and hit everything I want to hit all at one time in the morning. It may be weeks until I need to spray again, so I don't keep poison in the sprayer. I use it and clean it.
This type of herbicide kills what's there and then dissipates. The weeds will grow back in a couple of weeks. There is another type of herbicide that lasts the whole growing season. Whichever you use it is best applied when there is no wind, because whatever green thing it hits, it kills. Warmer, dry weather will help to induce the poison into the plants. If you have never used this type of thing before, make sure you read the directions very carefully before you start spraying.
Saturday, July 18, 2009
For the Record - In The Beginning
These photos are from the first group of photos I took of the house during the period of time after the owners accepted Becky's offer but before Becky closed on the house. That was April, 2006.
The top photo shows the large stacks of brick on the left side of the house and the brick parking area on the right side. I have re-stacked, moved, stacked, laid, picked up, stacked, moved, re-stacked, moved again, and re-stacked this pile of bricks. I think they now qualify as "tumbled" brick because they've gotten a little worn.
In the bottom photo a few days later, the alley and half of the yard is under water. I had forgotten there was a fence behind the house across the alley.
Friday, July 17, 2009
Summer Time Survey
This is the current progress photo. The grass has filled in though most of it is crab grass. The last time I mowed the lawn I set the mower cutting height two notches above extremely low. From here on until the dormant season I will gradually raise the mower cutting height each time I mow. By the end of the season I will have the grass cut as high as my mower will cut to over winter.
I'm doing a survey of improvement projects I would like to do when the heat of summer is past. The survey amounts to a jig-saw puzzle of different projects for different parts of the lawn. The size of each project is limited to what I can cover in a brief post to my web log. If the master plan is in manageable bites, then the various jobs should naturally organize into bite sized undertakings. In the process I should become well informed as to tool requirements and material requirements. Maybe the time spent in study will stimulate my imagination to more creative applications when the time comes to do the work.
Thursday, July 16, 2009
The Garden Always Grows.
I once read about a custom in the Japanese home: The man of the house takes a brush and a bucket of water and scrubs the stones of the foot path from the gate to the door just prior to the arrival of guests. This ritual was repeated when the guests departed.
Dirt is constantly tracked into our house from outside. I want to be able to walk barefooted all the way around the house and not get my feet dirty, and not get any chigger bites. I may find ideas to overcome this condition meditating on the Japanese idea of "Be clean". I may see how various Japanese gardeners express this ideal in their gardens. Humility opens the mind to ancient wisdom. Wisdom opens the eyes to see what to do.
The story of creation for the Jews, Christians and I think also the Muslims begins in "The Garden". That is something worthy think about.
Wednesday, July 15, 2009
Garden Variety Inspiration
The photo above is of the Tofukuji Garden. Maybe in three or four hundred years my yard will be as well dressed. In three hundred years my yard could be so well tended that you have to stand at a safe distance to admire it. A landscape so precious that only the keepers set foot in it. So old that it is a national treasure. So valuable that it's maintenance gives rise to careers of master gardeners who become so great they have their own gardening T.V. networks.
If it is to be I'll never know. Still, the Japanese and their gardens are a great source of refreshing inspiration. I think this type of landscape represents a specific locale on the Japanese islands where the sea meets the land. Maybe I could do a landscape of Petit Jean mountain with the river flowing by and the flat, verdant river valley stretching out on the other side.
This garden in Japan is an inspirational testament to a culture as old as the ages. This garden in Argenta is only 80 years old. It is Bob and Becky's for now.
Tuesday, July 14, 2009
Hydrant Tree
In keeping with the mid-summer planning for cool weather work, this is my improvement plan for this area.
I call this spot in the back the hydrant tree because the water hydrant is behind it. This area makes me think of a picnic area. I want to use the tree and roots as a landscape feature. I put a little #2 mulch here and laid down the brick walk to get some kind of idea about what to do here. Now after some time I have the next thing in mind.
I want to see a thick spread of grass here that's about 3" deep surrounding a strategically placed brick walk or stepping stones.
I'm going to begin by removing the screening gravel in the area visible in this photo. I will be glad to use the screenings somewhere else, maybe under yon gate. For the time I am going to lay down a brick walk as in the photo, but further away from the tree and carried on between the corner of the house and the red tip shrub. I will work towards dedicating 75% of the production of #2 mulch to this area to build up the soil. I'm going to pay particular attention to keeping this area well watered. I will pluck up the unwanted plants as they sprout and cultivate the thicker, taller grass here.
Monday, July 13, 2009
Front Steps
There is a narrow, thin slab of concrete across the front of the house and on either side of the steps. I presume knee walls used to stand there, creating planting beds. I suspect some of the spare bricks I stacked in the back yard came from there.
My master plan is to rehabilitate the front porch area. The rehabilitation includes removal of the existing concrete deck, steps, and concrete wall caps. The brick walls would be completely reworked and topped with new caps, and a new concrete deck and staircase constructed. The knee walls of the staircase and planting beds would be reconstructed as well, using the brick stored in back. The porch roof also needs to be reworked. My dream is to accomplish this by winter of 2011.
But for now, in mid summer, I am making cool weather work plans for the fall and into the winter. I feel like the people in a department store. They are in preparation for the end of summer sales and the advent of "back to school". The fall colors are probably being distributed behind the scenes at this time. Preparation is key and now's the time for fall preparations.
This is my cool weather work plan for this area. The mulch comes out of the beds to be reprocessed with the mulch from the mulch pile. I will pull up the border grass and taking a sharp shovel, I will cultivate the soil in the beds leaving them clean and raked smooth. The shrubs will receive some thinning and shaping. I will separate and re-plant the border grass to make a more even border. When I am satisfied the beds are "all square", I will cover them with some number 3 mulch to over- winter. Maybe Becky will find some fall color to plant in the beds.
The newly developed bed on the east side of the porch will need complete reconstruction to transform the bed from a temporary feature to a permanent fixture. Maybe I will call this bed my orphanage as I started it with orphan plants.
The ground between the front porch corner and the tree to the left is in a state of uncontrolled erosion. I'm going to address that with some sort of check dam. The addition of some mulch and grass seed will encourage the front and side lawns to join together.
Our property line runs down the middle of the drive as the fence line indicates. I thought it was by the tree in front on the left. We discovered this when the fence installers located the the pins that mark the corners. The house is not square on the lot. At the front corner of the porch there is only about 4' to the line, if that. The days of using this for parking are numbered.
Sunday, July 12, 2009
In the beginning there was smoke and fire.
In an earlier post to the "grilling initiate" I wrote that humiliating failure can be turned into "the spur that drives to success." I dug through our archive to find these photos from New Year's Eve, 2005. These photos record the beginning of my story.
The event of record is my first romantic get-away with Becky to Devils Den state park, before we were married. The more I "self-medicated" with beer (as Becky put it) the smokier the cabin became. (I had no garden, you see.) I finally gave up. These photos are hard for me. The story of my humiliating inability to handle fire was a favorite one for Becky to tell and re-tell our friends. The friends told more friends and my reputation began to proceed me. I admit it - this reputation was deserved.
I knew this was the big opportunity for which I had cried out for. I decided to use this humiliation and failure to master fire making. First, I convinced Becky to marry me. Next we got this house which then had a wood-burning fireplace. I built my own grill out back. We invited family and friends. I taught myself, I learned, the art of a good fire. It is all about being in love and sharing hospitality.
I am the only one now who brings up the "Smoke Filled Cabin at Devils Den" story. "They" don't make fun any more. Now they call me the "Grill Master".
To the "Grilling Initiate" - It is love that gives the wisdom, and the ability to strengthen weakness. The garden is a good place to exercise this lifelong transformation.
Saturday, July 11, 2009
Empty Nest Syndrome
A bird family was raised under the shelter of our roof this year, and now they've all flown. I got a lot of happiness from their stay with us. They built their nest under the roof of the basement stairs on a dust pan. The cats never were able to breach their fortress.
When I was a house painter, I saw the birds hatching many a spring. There is a full, happy chaos of family life. The season passes and one day the nest is empty and that time of the family nest is over. I've seen this while painting for many families, too. I was hired to be the agent of the passing season and the agent of the new season. The old family moves out and the new family hires me to cover over the old to establish the new. The time goes by and what was new then becomes the old.
Time passes and does not relent. Sometimes this imparts feelings of pain and sorrow. Time and place and people pass and don't come back. But life also presents us with a constant renewal, for which we celebrate.
To me gardening is fulfilling work that expresses the beautiful. It's the constant growth which needs my care and my guiding hand. I won't worry over what will become of my old nest when I leave it. I will do my best to cherish my garden ever presently.
I'm going to do these birds a favor and respectfully toss their old home on the compost heap. I miss them and I hope they are all doing well. Maybe we will meet again next year.
Subscribe to:
Posts (Atom)